Speed up development with OutSystems by standardizing External Syncs Behaviors
A very common requirement in software development is to be able to Synchronize data from an external system in order to cache this data in your own database and thus, among other things, be able to perform data mashup or even to improve your system’s performance.
With OutSystems this is no different and I think it’s no exaggeration to say that in 95% of the projects I participated in I had to implement something like that.
We can even understand how common this requirement is by looking at this OutSystems documentation article (which I personally think is one of the best ever created) that specifically addresses patterns for this.
Knowing this, over the years I’ve started to identify useful features and common behaviors that could be generalized and standardized regardless of the type or the nature of the Sync we are trying to integrate.
With that in mind I ended up creating a very simple to use pattern that allows me to be even more efficient with OutSystems and recently I thought it was a good time to share with the community.
Then, I created a forge component with a generic module that can be used to accelerate your way of synchronize data with OutSystems.
Main Features:
- Keep track of all steps, logs and errors that happens on your synchs.
- Manage different synch types status, periodicity and other properties in a centralized place
- Manually start a synch if needed.
- Keep the history of the synch runs if you want. Also delete it after a specific time if you don’t need anymore.
- Define the default behavior and limit access to change the synch properties using roles.
- Don’t worry about very long processes, the synch will run in background timers which have a control to end and restart if the session is reaching the timeout. (It will stop and on the next run start where it ended on the previous step)
What the component has:
To help use this pattern I decided to explain in more details how you can make it work with your own code.
Once you download the component you will see 2 modules. They are just generic modules with common screens and actions that have to be customized:

In order to explain the usage, let’s analyze the Demo App also included on forge looking at its architecture:

To help me demonstrate the usage, I create 3 more modules besides the ones from the component.
They are:
RRGenericSynchPatternSample_DB
A module that holds my entities and CRUD actions. In a real scenario it would be my real entities that I want to populate with the data from an external source
RRGenericSynchPatternSample_IS
My Integration Service Module which consumes external APIs and normalize the data to be consumed by my other OutSystems’ apps
RRGenericSynchPatternSample_API
A module created just to mimic an external source. It just exposes APIs to be consumed by the IS module. In a real scenario it would not exist, since the external source would be another system
With that being said let’s start.
How to use?
To start using and customizing it we just need 8 steps
1 — Clone the modules:
The first step after downloading the component is to clone it to ensure it can be used multiple times.
2 — Rename the modules:
So, to keep it organized, it’s a good idea to rename it.
A quick way is to look up the string ‘ModuleName’ in ServiceStudio and replace it with your own module name. (Remember that long names can be a problem as we have some entities and attributes with ModuleName in the name and since the attributes and entity name have a character limit this can lead to unwanted behavior)
3 — Create your Synch Type in Static Entity:
The third step is to create a new SynchType record in the Synch_Type Static Entity so that you can manage them

You will see some sample types that can be used as guides.
4 — Customize the specific actions for your Sync:
After creating the type we also have to create 2 specific actions for each sync type, to make sure your logic can be as you want.
First copy the ‘Synch_GenericSample’ folder to serve as a guide and customize your actions.

Keep in mind that if your use case is to have Multiple Runs (MR) the ‘Synch_GenericSampleMultipleRuns’ folder should be used instead:

We will see more details about MR in the end of this article
5 — Fisrt Action to be customized, Synch_NameOfYourSynch
Inside the folder you copied you will find an action named SynchGeneric.
You should change the generic part of the name to something that can help you identify it.
Inside it you will have to call your data source action (Probably from IS Module) and delete the variable list to use the new List from your data source action, the list variable is only being used as a placeholder at this time:

You will have to handle the errors replacing the old list variable by the new list from your actions:

If you look at the Sample App you can see the final result, and you should have something like:
6 —Second Action to be customized, CommitSingle_YourTypeName:
The second action is the CommitSingleGenericSample.
It will be responsible to validate and persist each of your records on the DB.
The record input parameter should match the type of your data source list response:

Looking at the Sample you can have an idea:

7 — Create the 3 timers:
Each sync type must have 3 different timers.
So create 3 timers to be used by your Sync and change your SynchTypeId:

They will be used to trigger your logic.
8 — Change the switches needed:
Finally, set the correct timers wakes and actions for the switches. Don’t worry, within the module you’ll see reminders in the warning tab to help you figure out where to do this:

And that’s it!
Just repeat this same process for new sync types (except steps 1 and 2) and you’ll have the same features and a good pattern for all of them.
In the ‘StartsSynch’ action, you will find some instructions to remind you what you need:

You’ll be able to set the frequency which you want to run your sync, view the history of executions, see possible errors, set the sync as active or inactive and much more. We’ll see it in action at the end if this article:)
Other Features:
There are some other features that are out-of-the-box.
Multiple Runs (MR) and Last Date:
For example, in the synchType entity you will see 2 attributes:

HasLastDate and CanHaveMultipleRuns
If set as true for your Synch Type it will slightly change the Synch behaviour.
HasLastDate can be used to set the base date to sync to fetch only offset data. If your external API supports a datetime parameter where you can change the date only after a specific date, for example, you can use it. It can also be changed manually in the UI if you want to replace it.
The CanHaveMultipleRuns field can be used if you need to call the source data action more than once in the same sync. Let’s say you already have departments in your solution and for each department you have to call an API to fetch employees. You can use this to make it happen. Remember that in this case some other things must be customized, we also leverage some other fields to help this process, for example GenericIdentifier or LineLvl2 of TempSynch Entity:

Site Properties:
In addition, we have some site properties that can change the behavior of the system:

isActiveManagementEnabled and isPeriodicityManagementEnabled, for example, will enable and disable the end user’s ability to change some properties of each synchronization.
This can be used if you want to leverage logs and logic but don’t want the user to change anything.
Delete pattern at the end of the Synch:
In the sample app, you’ll find a way to remove items that haven’t been synced as well. Depending on your use case, it might be helpful.:

You can also create a pattern to invalidate the cache, if you wish, in case of changes.
The sample in Action:
Before using the sample, make sure you configure the correct username / password and integration link to be used in the Service Center.
In the demo app we have 3 different types of synch.
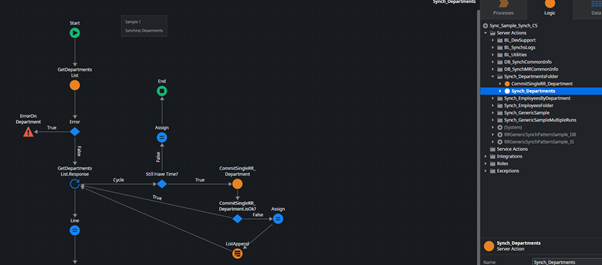
The first one is a Department Synch:
In the back office you can define whether synchronization is enabled or disabled, how often you want to run and even start a manual run.
After each round, a log is created where you can check what happened.
You can always check the entire history too.

The second sample is an Employee Synch.
This one has some validation to check if the departments already exist and if not the specific item won’t be created.
Of course, we can also change all properties for this synch:

In order to show an error case, I manually deleted some of the departments from my database and the result was as expected. After that, I ran department sync again and then I ran employee sync as well, and once again the sync was successful:

The third sample is a special case, it is the Employee By Department Synch.
This synch is a case of MR (Multiple Runs).
Where we must use the same process for different items.
For example, imagine that your external system only provides an API to fetch the Employees of each Department individually.
Therefore, we have to run the synch for each department. And this is the case with this sample.
You can see that before changing properties or manually initiating a synch, you must select which instance to use:

That’s it!
I really hope it helps you and your team be more efficient than ever when using Synchs
