How we used OutSystems in a Blockchain Hackathon!

Introduction to blockchain
If you are someone who follows technology trends, works in the IT field, or even in the financial sector, you most likely have already heard the term ‘Blockchain.’
You might not know exactly what it is, but since it is a term commonly associated with cryptocurrencies like Bitcoin or Ethereum — hot topics nowadays — you must have heard it at least once during a conversation with geek investors or friends.
And in case you took some time to really understand it and also know OutSystems, you might be wondering:
“What the hell does it have in common with OutSystems?”
Well…
With OutSystems, a lot is possible!
But before we jump into the OutSystems + Blockchain realm and answer this question, let’s very briefly understand a little about what the term ‘Blockchain’ means.
If you Google it, you might find something like:
A blockchain is a distributed database that maintains a continuously growing list of ordered records, called blocks. These blocks are linked using cryptography. Each block contains a cryptographic hash of the previous block, a timestamp, and transaction data. A blockchain is a decentralized, distributed, and public digital ledger that is used to record transactions across many computers so that the record cannot be altered retroactively without the alteration of all subsequent blocks and the consensus of the network.
In simple terms, we could say that blockchain is a concept of a database maintained by people (or nodes) that stores transactions (or blocks) that always reference the previous block, forming a chain of blocks (aka Blockchain).
Since multiple people/nodes maintain this network, it is considered decentralized. And as each block is protected by cryptography and relies on these people to retrieve the information, it is considered very secure.
After all, you can’t change something yourself if everyone in the world knows the truth.
You can also have multiple blockchains. That’s why we have so many cryptocurrencies, such as Bitcoin, and they don’t impact each other because each one is a different blockchain.
I don’t want to delve too deeply into how blockchain itself works, as it is not the objective of this article, but if you are really interested in understanding it, I recommend this link or this link, which visually explain the interactions in a blockchain step by step.
Anyways, the best part about it is that, as blockchain is a ‘database,’ you can use it for multiple different use cases.
In the Bitcoin use case, which is to provide an alternative to physical currency, the blocks mentioned above contain information about the financial transactions made inside that network. But nothing stops you from creating different networks to be used for something else.
In fact, most blockchains have their own objectives.
Another famous one is Ethereum, which uses blockchain technology to maintain a decentralized payment network and seeks to become the foundation for Web 3, the infrastructure being built to decentralize the Internet.
Unlike Bitcoin, Ethereum is not only a currency; it is actually meant for more complex transactions that are enforced by what they call Smart Contracts.
Smart Contracts, in turn, are programming codes that are stored in the blockchain and serve as an agreement between two different parties. When triggered, the code is executed, and the transaction results are also stored in the blockchain, making it trackable and irreversible.
You can imagine how powerful this is: it’s a contract that can never be broken and that everyone can check at any time.
With this in mind, we decided to use OutSystems to integrate with them. So let’s see how it went!
Where the idea came from?
In the middle of 2024, Pedro Neto, a friend of mine and an OutSystems Champion, challenged me to participate in a Blockchain Hackathon with him.
This Hackathon was for ChainLink, a decentralized network that connects off-chain data to smart contracts on blockchains.
But honestly, we had no idea what to do at first.
Pedro had some experience in the crypto world but was no expert.
And I was starting from scratch, with little to no knowledge at all in the area — a complete rookie.
We started our discussions based on the little we knew and decided that doing something related to NFTs and games would be fun.
We defined our high-level objectives, had great technical ideas, researched what we would need, and started doing PoCs with OutSystems.
However, we quickly realized that we would need a good UI and art for our NFTs, so we also invited Robert Muñoz, another friend of ours and a designer, to help with the process.
That’s how we started the development of our first OutSystems + Blockchain project, codename Frankie.
Frankie — NFT Maker
Frankie was the codename for our first project. Our inspiration for the name came from Frankenstein, and you will understand why in a second.
Our main goal was to enable people to create their own Dynamic NFT Collections on the blockchain.
These collections can be used for any use case, such as games, art, etc.
As part of the app, you can define different traits or attributes your NFT should have. For example, an arm, a leg, a body, etc, ultimately forming a Frankenstein, hence the name.
Frankie was also the project that drove us to create some other Forge components related to Blockchain.
For example:
- EVM Smart Contracts MetaMask Connector: A component to call methods from Smart Contracts on the client side, using MetaMask to sign your messages.
- Nethereum: A component to interact with Smart Contract methods by invoking them programmatically on the server side and programmatically deploy a smart contract to the blockchain.
- Alchemy API Services: A wrapper for Alchemy APIs for smart contracts and NFT operations on the Ethereum blockchain.
Each of these components deserves its own article, so I will not dive into details here. Maybe, in the future, if time permits, we can expect new articles about them.
However, Frankie itself was already a huge learning opportunity —
not only with OutSystems by creating all these components, but also in different technologies, such as Solidity and MetaMask.
Solidity is the language we used to create the Smart Contracts. Once created, we could deploy them to the blockchain and use an OutSystems app to interact with it.
MetaMask is an Ethereum wallet that allows users to store and manage account keys (private keys that only you should have) and, in this way, interact with smart contracts, different apps and the Web3 through the browser. We will take a closer look at it in the next section.
It is important to note that we used a Test Net to develop our code, which is a test version of the main network. This was important because each transaction on the blockchain has a cost. In the Ethereum network, for instance, you have to pay ETH.
When using a Test Net, you don’t need to use real ETH, so you don’t spend your own money.
If you want to set up the app for your own use, you will probably need to configure all site properties to point to a specific test network and deploy the smart contracts there as well.
You can find the source code for the Smart Contracts on this GitHub.
Also, check our submission link here for the Hackathon for a more detailed view of the Smart Contract architecture, along with a cool video presenting it.
In fact, check out the video right away if you are interested:
Smart Contract, Solidity, MetaMask, Web3, DApp? How to use them?
So far, we have introduced many concepts that might be new to you.
To recap:
- A Smart Contract is code that is stored on the Ethereum blockchain and, when executed, also stores its result on the blockchain so it can always be checked.
- Solidity is the programming language used to write those Smart Contracts.
- MetaMask is a wallet that allows you to organize your accounts and use them securely to interact with the smart contracts.
- Web3, also known as Web 3.0, is a vision for the next generation of the World Wide Web (WWW). It’s built on blockchain technology and other concepts, and aims to create a more decentralized, open, and user-centric internet.
- A ‘dApp’, or decentralized application, is an application built on a decentralized network that typically consists of a smart contract backend and a user interface frontend.
However, to make it clearer, let’s understand how they really interact with each other.
If we start with a Solidity Smart Contract to have an idea, this is how it looks:
// SPDX-License-Identifier: GPL-3.0
pragma solidity >=0.4.16 <0.9.0;

contract SimpleStorage {
    uint storedData;

    function set(uint x) public {
        storedData = x;
    }

    function get() public view returns (uint) {
        return storedData;
    }
}
You can notice that it looks very similar to a C# class, where you have attributes and methods.
If we want to be more technical using the example above we can add the following information (Source here):
A contract in the sense of Solidity is a collection of code (its functions) and data (its state) that resides at a specific address on the Ethereum blockchain. The line
uint storedData;declares a state variable calledstoredDataof typeuint(unsigned integer of 256 bits). You can think of it as a single slot in a database that you can query and alter by calling functions of the code that manages the database. In this example, the contract defines the functionssetandgetthat can be used to modify or retrieve the value of the variable.
You can use it to define your own functions according to your needs, and once ready, you can use a compiler, such as Remix, to compile this contract and create some artifacts.
Here is an example of the above contract compiled in Remix and the artifacts generated:

Among these artifacts are some JSON files that contain important information, such as the Smart Contract:
- Bytecode: The machine-readable version of a smart contract that is stored on the blockchain and executed by the Ethereum Virtual Machine (EVM).
- ABI: The Application Binary Interface (ABI), which is a human-readable representation of a smart contract’s code interface and defines how to interact with it in the Ethereum ecosystem.
Using this information, you will be able to deploy the contract to the blockchain, which will create a contract address. This address is a unique identifier that represents the smart contract and is used to interact with it to trigger its functions or transfer tokens.
However, in order to interact with this contract address as a user, you also need your own identification. And that’s where MetaMask comes into play.
After you create an Ethereum account, you can add it to your MetaMask wallet. You do this by adding your account’s private key, which is later used to sign all transactions you make and ensure you are really who you say you are.
The private key you add to MetaMask is always kept locally and never shared, so only you have this information.
In the Chrome browser, for example, it is used as a Chrome extension, and it exposes some JavaScript functions that developers can use to interact with a smart contract, by passing the contract address and method information, including any input parameters.
Whenever these MetaMask JavaScript functions are called, the MetaMask extension prompts the user to confirm the operation and sign the transaction. For example:

The private key is never shared and is only used to sign the message.
A good example to understand this interaction is the EVM Smart Contracts MetaMask Connector forge component.
You can access the “Try Now” page here.
There, you can provide your Smart Contract information, including the ABI and address, and it will list all available methods that you can use with MetaMask.


Please note that the sample contract provided on the “Try Now” page is deployed on a Test Net, so it might stop working at any time.
MetaMask also uses the official Web3 official JavaScript SDK, making the life of developers much easier by streamlining the process required for dApps to interact with Web3 elements, such as Smart Contracts.
Everything we just saw is just the tip of the iceberg that we had to learn to create our project, Frankie.
To give a high-level idea of the scope in more details, check out some of the features Frankie has in the next section.
OutSystems’ app Frankie Features
In case you want to check the source code of Frankie, you can go to Forge here and download it yourself.
It is not updated with all our new components, but it has pretty much the base we used for them.
Among the features we developed, we can highlight the following:
1.1 — Collection Creations
‘Collection Creation’ is the UI that lets the user define which traits their NFT will have and automates the creation and deployment of the smart contracts needed to create these dynamic NFTs.
To start a collection, you first need to log in to our product, make sure your wallet is connected, and click on the “Create a new Frankie” button in the ‘Creations’ menu:

After clicking, you will be redirected to our lab, where you can start customizing your Frankie:

Here, you will give a name to your collection, select the blockchain you want it to be deployed on (for now, only Avalanche Fuji is supported), and define the price of your NFT.
Here you will also find an advanced section:

This section contains fields that, for now, are blocked but are also part of the collection.
The future idea is to allow users more freedom in their creation.
The integration hostname, for example, is the address the collection will use as the base domain for its URI operations. For example, the GetURI method of the NFT will use this hostname as a base and attach /GetTokenURI to the end. This link will be used by external sites like OpenSea to retrieve the NFT’s information. For now, we use our own server as a proxy, always getting the information directly from the blockchain. In the future, the idea will be to make it customizable so users can use their own logic or external providers like IPFS.
The NFT dimensions represent the size of the canvas your appearance traits will have.
This means that all your images need to use these dimensions as the ViewBox they will be on.
This is to ensure that all the layers are correctly positioned when merged. For the time being, we are locking the NFT size to always be a square of W 500 x H 500. In the future, this is something that will be customizable.
Once you define all the required fields and click on ‘Start Mutating,’ you will be prompted to sign a message using MetaMask:

This will be used to define the ownership of your collection.
After you sign it, you will be redirected to a new screen:

Here you will be able to define which traits the NFTs of this collection will have.
You can create four different types of traits: Appearance, Option, Range, and Label.
To add a new trait of a given type, select the tab of the trait you want to add, and click on the ‘Add new [Trait type] trait’ button on the top right:

‘Appearance’ Trait Type
The appearance traits are those that have a visual representation on the NFT.
Once you click on the Add button, you will be able to define its details:

First, you need to define the trait name. In this example, we want to add the body of our NFT.
So, we will define the name as ‘Body.’
Then, you can define if this trait is optional or not. If it is optional, you need to define the chance it has of appearing when you mint an NFT:

When an end user mints an NFT, the smart contract will use the VRF Chainlink product to get a random number and use this random number and the ‘Chance of Appearing’ field to determine if the trait will be present in the NFT. (The VRF interactions will be explained later in this article.)
The fields ‘Trait Name,’ ‘Optional Trait,’ and ‘Chance of Appearing’ are common to all trait types and follow the same structure and rules.
For the Appearance trait type specifically, you can also define the different options it will have.
To add a new option, click on the ‘Add new option’ link, and you will be able to define the option’s details:

You can add as many options as you want, and each option will have an image, a name, and also an appearing chance.
The ‘Option Image’ is the image this option will have on the NFT when it’s minted, and it needs to be an SVG, with 500 x 500 dimensions. The choice of using an SVG at this point was simply to allow CSS customizations in web games, like animations or effects. In the future, the plan is to allow different image formats, such as PNG.
The ‘Option Name’ is the value the trait will have on the minted NFT.
The ‘Option Appearing Chance’ is how likely this option will appear on a minted NFT compared to the other options. All the options’ ‘Appearing Chances’ summed up need to have a total value of 100%.
For example, in this case, we have two options for the Body trait: ‘Blue Body’ and ‘Yellow Body.’
Both will have the same chance of appearing, so each one’s ‘Appearing Chance’ is 50%:

When an end user mints an NFT, the smart contract will use the VRF Chainlink product to get a random number and use this random number and the ‘Appearing Chance’ field to determine what option will be present in the NFT. (The VRF interactions will be explained later in this article.)
Once you define your options and click save, you will see them on the left list. You will also see a preview of a possible NFT on the right:

To give a better idea, we will also add some wings and eye appearance traits to our demo collection. It should look like this:
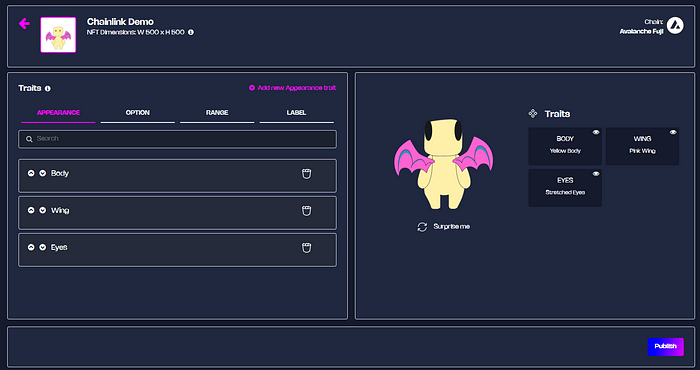
You will notice that the wings are on top of the body. To fix that, you can use the arrows on the left to change the order of the traits:

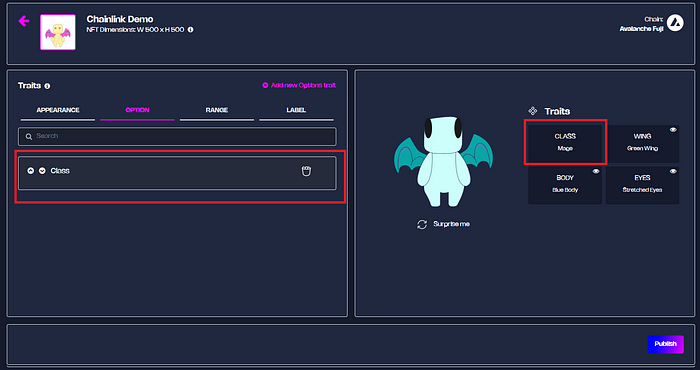
‘Option’ Trait Type
An ‘Option’ trait is very similar to an ‘Appearance’ trait.
The only difference is that it doesn’t have an image:

If creating an NFT for a game, for example, you could use it to define what the character class would be — whether the NFT will be a Warrior or a Mage, for instance:
Once you add your options and save, you will also see them on the NFT preview:
‘Range’ Trait Type
A ‘Range’ trait is a number that will be between a range. For example, if using an NFT for a game, you could have a ‘Range’ trait called Strength that would have a value between 10 and 40:

When an end user mints an NFT, the smart contract will use the VRF Chainlink product to get a random number and use this random number and the defined range to determine the value of the trait that will be present in the NFT. (The VRF interactions will be explained later in this article.)
‘Label’ Trait Type
A ‘Label’ trait is as simple as a static field.
This type is not random and will always have the same value.
You can use it if you need to define a specific address, link, or string:

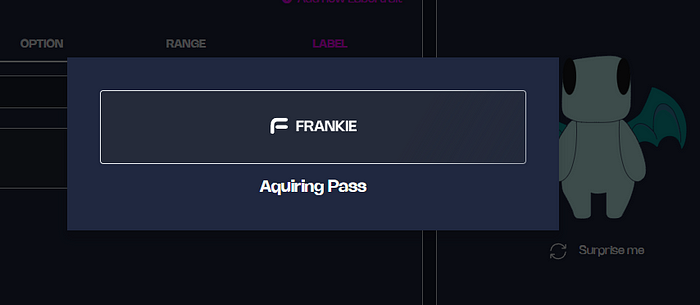
Finally, after you define all the traits you need, you can publish your collection:

Once you click this button, the system will first check if you have a pass to be able to publish your collection.
A pass is how we monetize our product.
It will give you the right to publish a collection and is a single-use.
Meaning that after you use it, if you want to publish another collection, you will need to buy a new one.
If the system identifies you have an unused pass, it will use it automatically. Otherwise, it will prompt you to buy a new one using MetaMask:

Once you confirm and buy a new pass, you will be prompted to sign another message to start the deployment and configuration of the smart contracts needed for your collection:

This signature is just to validate the ownership of the pass and the collection.
All the deployments and configurations are done from the server side and will be explained later in this article.
After the deployment is complete, we sync all traits of the collection:

And finally, make sure all the final adjustments are defined, and the collection is now locked so no one can change it anymore:

When everything is done, you can’t edit anything else, but you can mint an NFT for this collection using the “Mint” button on the bottom right:

If you click it, you will be prompted to give your NFT a name:

When you click mint, we use the Price Feed Chainlink product to calculate how much the NFT costs in AVAX (since the chain being used is Avalanche), based on the dollar price defined in the collection.
The user is then prompted to accept the transaction:

And an NFT is generated:

1.2 — Ghoul Store
The Ghouls Store is where you can check all the different collections published using Frankie. Here, you can also select one collection and mint your own NFT:

1.3 — Surf Game
The Surf Game is a very simple sample game showing how people can use the collections created on Frankie to build their own games.
You basically need to mint your own surfer and board NFTs from the surf collections and deploy them to a queue that will be processed to define your surfer’s output.
It uses real-time data from Australian beaches to check how difficult it is to surf a certain wave at a given moment, and the NFT traits to check if your surfer is good enough to surf that wave.
hen, using VRF random elements, it decides if your surfer can do certain tricks and gain experience.
The game uses Chainlink Automation to process the queue of surfers and VRF to decide if the surfer will succeed.
1.4 — Admin Section
If you use an Admin user, you will also notice that we have an Admin Section:

Here, we define certain info to support the product.
The Smart Contract Codes is where we define the ABIs, bytecodes, and addresses of all contracts we need to deploy and use during our process:

These contracts are automated in a way that every time we publish a new contract, it is automatically uploaded to our product, and all collections start using the new version right away.
The Smart Contract Roles is where we define the roles we use for given permissions on the collections.
The Legacy Collections is a developer view of the collections that allows us to access the contract’s methods directly.
The Royalties is where we define how much a pass costs and how much we get when an NFT is minted using our collections.
The Surf Game Admin is the place where we configure which collections are used by the Surf Game.
Conclusion
And that’s it! We didn’t win the Hackathon, but the experience we gained is priceless.
After Frankie, we also participated in another Hackathon and created the app BusinessOnChain, which is yet another topic for a future article.
I hope you enjoyed this and that it helps people in the future who have use cases with Blockchain.
Best regards, and let me know your thoughts and if you have any interest in Blockchain use cases with OutSystems.
Special thanks to Pedro Neto for encouraging us to participate in this Hackathon and leading the development of the smart contracts with Solidity.
